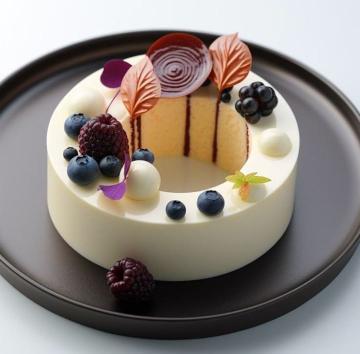
It was one of those quiet afternoons when the sunlight just barely leaned through the window, and I found myself whisking cream in that half-dreamy, half-hungry state. You know the one—when you’re not quite sure if you’re cooking for joy or for art. This cake was born out of that mood. The kind that whispers, “Why not something elegant today? Something glossy. Something that feels like silk and sugar in one bite.” So here it is—this stunning White Chocolate Berry Mousse Cake with Mirror Glaze. Not just a dessert, but a little celebration of precision and whimsy all at once.
This is not your everyday sponge cake. It’s a multi-layered composition—airy sponge nestled beneath clouds of white chocolate mousse, threaded with ribbons of tart berry compote, then sealed in a mirror-like glaze so reflective you could almost fix your hair in it. There’s something magical about mirror glaze—it’s both science and theater. And the way it melts against your fork? Oh, pure poetry.
What makes it special isn’t just its looks (though let’s be honest, it is a showstopper). It’s the delicate balance between sweet and tangy, creamy and fluffy, luxurious and light. It’s a cake that demands patience but rewards precision. It’s the kind of thing pastry chefs quietly compete over, tweaking ratios in notebooks like alchemists in aprons.
Let’s dive in. Not just how to make it—but why it works, how to get it right, and where it all might go wrong if you blink too long.
Ingredients & Substitutions
The beauty of this cake lies in its clean, structured build. You’ll need a few components: sponge base, berry compote, mousse, and the mirror glaze. Yes, it’s layered, but not overwhelming. Once you understand how each part behaves, they’ll start talking to each other.
Here’s your full ingredient list, neatly organized for mise en place.
| Component | Ingredient | Measurement | Notes / Substitution |
|---|---|---|---|
| Sponge Cake | Eggs | 3 large | Room temperature |
| Granulated sugar | 90g (¾ cup) | Fine sugar works best | |
| All-purpose flour | 80g (⅔ cup) | Can use cake flour for softer crumb | |
| Baking powder | ½ tsp | Don’t skip—adds lift | |
| Melted butter | 25g (2 tbsp) | Or neutral oil for lighter texture | |
| Vanilla extract | 1 tsp | Optional but adds warmth | |
| Berry Compote | Mixed berries (blueberry, raspberry, blackberry) | 200g (1½ cups) | Fresh or frozen |
| Sugar | 50g (¼ cup) | Adjust to taste | |
| Lemon juice | 1 tbsp | Brightens flavor | |
| Cornstarch | 1 tsp | Helps thicken | |
| White Chocolate Mousse | White chocolate | 200g (7 oz) | Use high-quality couverture |
| Heavy cream | 300ml (1¼ cups) | 35% fat, cold | |
| Gelatin sheets | 2 sheets (4g) | Or 1 tsp powdered gelatin | |
| Milk | 100ml (½ cup) | Warmed | |
| Vanilla bean paste | ½ tsp | Optional, adds depth | |
| Mirror Glaze | Sweetened condensed milk | 100g (⅓ cup) | Adds shine and sweetness |
| Sugar | 200g (1 cup) | Fine granules melt evenly | |
| Water | 100ml (½ cup) | For dissolving sugar | |
| White chocolate | 200g (7 oz) | For glossy body | |
| Gelatin sheets | 4 sheets (8g) | Softened before use | |
| Glucose syrup | 150g (½ cup) | Prevents crystallization | |
| White gel food color | a few drops | Keeps glaze pure white |
Ingredient Insights:
Use fresh berries if you can—they lend brightness frozen ones can’t always match, though frozen works fine when strained. The mousse deserves good couverture chocolate, the kind that snaps cleanly. Cheap white chocolate often has more sugar than cocoa butter—it’ll set too sweet and grainy. For flour, cake flour gives a softer crumb but all-purpose keeps it sturdier under mousse. And when it comes to gelatin—quality matters. Always bloom it gently, never rush with boiling water unless you enjoy a rubbery surprise.
Step-by-Step Instructions
Alright, gloves off. Let’s build this masterpiece, layer by lovely layer.
Step 1: Prepare the Sponge Base
- Preheat oven to 170°C (340°F). Line a 7-inch round pan with parchment—bottom only, no greasing the sides. This helps it climb higher.
- Beat eggs and sugar until pale, thick, and fluffy—think ribbon stage. You should be able to draw an “8” and watch it linger.
- Sift flour and baking powder. Fold gently, almost lazily, to keep the air. Don’t stir, just lift and turn.
- Drizzle melted butter and vanilla down the side, fold in quickly.
- Pour into pan and bake 20–22 mins, or until top springs back.
- Cool, then slice horizontally into two thin discs. You’ll only need one layer for base, freeze the rest for later mischief.
Expert tip: Overmixing kills lift. Once flour goes in, treat it like it owes you money—be gentle but firm.
Step 2: Make Berry Compote
- Toss berries, sugar, and lemon juice in saucepan. Simmer low, 5–6 minutes, until juicy and jammy.
- Mix cornstarch with a spoon of water, stir in. Bubble another minute till glossy.
- Strain seeds if you like smoothness. Chill completely.
Avoid: Over-reducing. It should coat the back of a spoon, not clump like jam.
Step 3: Whip Up White Chocolate Mousse
- Bloom gelatin in cold water. Warm milk till steaming, not boiling.
- Melt white chocolate gently (double boiler or short microwave bursts).
- Stir gelatin into hot milk till dissolved. Pour over melted chocolate. Whisk till shiny-smooth.
- Cool mixture to room temp—lukewarm, really. Not hot.
- Whip cold cream to soft peaks. Fold into chocolate base in three additions. Slow and steady.
- If it’s too warm, mousse won’t hold shape; too cold, it’ll clump. Timing’s a quiet art here.
Common Mistake: Pouring hot base into whipped cream—deflation city. Always cool your mix first.
Step 4: Assemble the Cake
- Line a ring mold or silicone entremet mold (about 7–8 inches).
- Pour in half the mousse. Tap to remove air bubbles.
- Pipe or spoon berry compote into center ring, leave edges clear.
- Add remaining mousse, smooth top.
- Gently place sponge disc on top, pressing slightly to set.
- Freeze overnight—minimum 6 hours—for stability before glazing.
Pro Tip: Freeze rock solid. Semi-frozen cakes will streak or bleed under glaze.
Step 5: Mirror Glaze Magic
- Bloom gelatin.
- In saucepan, combine sugar, water, glucose. Bring to gentle boil till 103°C (217°F)—no stirring.
- Remove from heat. Stir in condensed milk and white chocolate. Mix smooth.
- Add bloomed gelatin, stir till melted.
- Add food color—just a whisper, enough to make it dreamy white.
- Cool glaze to 32–34°C (about 90°F). That’s your golden window.
- Unmold frozen cake, place on rack. Pour glaze in one confident swoop from center outward. Don’t double pour, ever.
- Let drip, trim edges once set.
Pro Tip: Use a thermometer. Temperature control is non-negotiable here. Too hot, it’ll melt mousse. Too cool, it’ll lump.
Cooking Techniques & Science
Mirror glaze is a tightrope walk of chemistry. Gelatin’s bloom strength binds sugar and chocolate, forming that glassy surface tension. Glucose syrup? That’s your insurance against sugar crystals—think of it as culinary WD-40.
Mousse, meanwhile, is all about emulsion—fat from chocolate meets water from milk and cream, stabilized by gelatin. Whipped cream adds air, gelatin locks it in. If your mousse splits, odds are temperature betrayed you.
The sponge’s role? Structure. It’s the quiet backbone, soaking any runaway berry juices, keeping balance. You could go flourless for gluten-free, swapping sponge with almond dacquoise—just mind texture shifts.
Tools That Matter
A good silicone mold gives smooth sides. A digital thermometer saves tears. Offset spatula for smoothing mousse, fine sieve for compote. Oh, and a stable turntable—once you use it, you’ll never go back.
Storage & Reheating
Store in fridge up to 3 days, covered—mirror glaze hates moisture. Freezer? Yes, for 2 weeks pre-glaze. Never reheat glaze once set; it won’t regain luster. Instead, keep leftover glaze sealed, rewarm gently next time.
Variations & Substitutions
- Vegan: Swap dairy with coconut cream, use agar agar (1.5x gelatin weight). Use vegan white chocolate—cocoa butter based.
- Gluten-Free: Almond sponge or hazelnut dacquoise base.
- Berry Swap: Passionfruit for tropical tang, or mango for sunshine sweetness.
- Marble Glaze: Add streaks of pastel pink or lavender for galaxy effect.
Serving & Pairing Suggestions
Slice with a hot, clean knife—wipe between cuts. Serve chilled but not icy, around 8°C (46°F)—that’s when flavors bloom.
Pair with a flute of Prosecco, or even a cold jasmine tea for subtle contrast. On plate, scatter a few fresh berries, maybe edible gold leaf if you’re feeling fancy.
For plating drama, use dark slate or matte black dish—the contrast makes glaze gleam like moonlight.
Best Time to Serve
This cake sings at celebrations. Birthdays, engagements, quiet Sunday afternoons when you need something a little outrageous. It’s too elegant for lunchboxes, too delicate for heat, but perfect for evenings with candlelight or a gentle hum of conversation.
And honestly? It’s a showpiece. Bring it out when you want silence to fall and eyes to widen.
Conclusion
What you’ve made here isn’t just dessert—it’s architecture. Balance, texture, patience all woven into one shimmering circle. Every layer does a job, every temperature matters.
Once you’ve nailed it, you’ll start dreaming of versions—dark chocolate raspberry, yuzu vanilla, hazelnut praline. Because the joy of pastry isn’t just in repetition—it’s in refinement.
So next time the sun leans through your kitchen window, and you feel that itch for something a bit extraordinary—remember this cake. Glossy, poised, quietly proud.
FAQs
1. Can I glaze the cake while it’s fresh, not frozen?
Nope. It must be fully frozen or the glaze will slide off and pool. The chill helps set it instantly, giving that smooth mirror finish.
2. Why did my glaze turn dull?
Temperature likely dropped too low before pouring. Always check—it should be around 32°C. Also, overmixing introduces bubbles that break sheen.
3. Can I make components in advance?
Yes. Sponge up to 3 days ahead, compote 1 week refrigerated, mousse same day only. Freeze assembled cake, glaze day of serving.
4. How do I avoid air bubbles in mousse?
Fold gently, never whisk once cream’s in. Tap mold lightly before freezing—those tiny taps save your surface.
5. Can I color the glaze?
Absolutely. Divide and tint sections, swirl just before pouring. But remember, less is more—subtle marbling beats rainbow chaos.
And there you have it—your very own Stunning White Chocolate Berry Mousse Cake with Mirror Glaze. Not just a recipe, but a little slice of edible elegance.